How To Migrate Email From One Gmail Account To Another
Whether you’re migrating from a work email address to a personal one or simply don’t like the username you chose out of the blocks and want to switch to one that sounds more professional, you are not alone in looking for a way to move all of your Gmail data from one place to another.
We’ve got explainers on how to create a personal backup of your work email and how to use Google Takeout to download Gmail messages and then restore them into a new account. But if you simply want messages from an old Gmail account to appear in the inbox of your new Gmail account, the easiest thing option is to set up POP (a.k.a Post Office Protocol) access.
Here’s how.
Configure POP access in your old Gmail settings
Start in the inbox for your original Gmail account (the one you want to forward). Click the gear icon in the top right corner of your message window and select Settings > Forwarding and POP/IMAP.

- Toggle Enable POP for all mail.
- Select what to do with the original messages in the dropdown under #2. You can keep, archive, or delete Gmail’s copy for this inbox or simply have messages marked as read.
- Click the Save changes button at the bottom of the window.
Import messages to your new Gmail account
Log into your new Gmail account and open Settings > Accounts and Import.
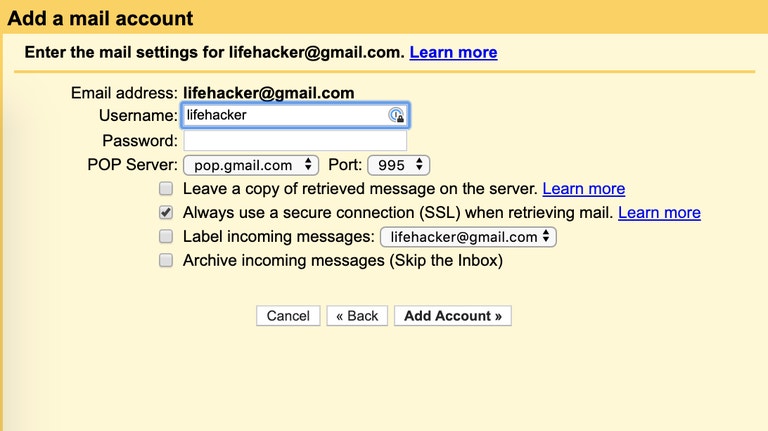
- Under Check mail from other accounts, select Add a mail account.
- Enter the Gmail address you’re importing from. Click Next.
- Select Import emails from my other account (POP3).

- Enter your account password and make sure “Always use a secure connection (SSL) when retrieving mail” is selected. All other toggle options depend on your personal preferences for managing and organising your messages.
- Click Add account.
- On the next screen, select whether you want the option to send messages under the old alias and Click Next > Next Steps.
Note: If you use two-factor authentication for Gmail (and you should definitely be using two-factor authentication for Gmail!), your regular password won’t work here. You’ll need to go to your Google Account > Security > Signing in to Google > App passwords. Sign in to your account, select the app and device you need the password for, and select Generate.
Confirm the connection between your accounts
Once you select to send messages with your alternate address, you’ll go through several additional steps to verify that your two accounts belong to you. Gmail will send a confirmation email to your old address with a confirmation code and verification link.
If you left the pop-up open from the previous step after clicking Next Steps, you can enter the confirmation code there. If you closed it, you can either click the link in the verification email or go instead to Settings > Accounts and Import in your new account, click Verify next to the email address you’re importing, and follow the prompts to enter the confirmation code you received. (Doing the latter will prevent any confusion about which account you’re logged into.)
An alternative for other mail clients
There’s another (much clunkier) way if you’re using a mail client like Outlook, Thunderbird, or Apple Mail to drag and drop the messages between accounts. You’ll have to set up your desktop client of choice to access both of your Gmail accounts via IMAP. Google details the process here, so we won’t go into every step. Also note that for this to work best, you’ll want to enable “Show in IMAP” for all of your labels (including Sent Mail and All Mail) in Gmail’s Settings > Labels.
This piece was originally published in April 2010 and updated in February 2020 with the most current information.